


Does anyone know how to import source models into blender with all the materials and all the shape keys with them like in sfm?
 1
1 1
1Does anyone know how to import source models into blender with all the materials and all the shape keys with them like in sfm?
11
In the qc, it will tell you which VTA file applies to which SMD mesh, and you should select that specific mesh for the VTA file to import correctly (for example; "$model "Head" "head.smd" { flexfile "vta_vertices01.vta" ). As for the eyes, the only (and I mean only one I could find) is a four hour long Youtube dissertation about projected eyes in Blender, and I haven't taken the time to watch it. The closest I got to it was to just layer the pupil/iris texture on top of the sclera texture as one image and move the UV of the eyes around to pose. It'd be closer to use the Projected Eyes system, but again, four hours.
In the process of all this I have found out the way to have the eyes done. I'll post screenshots of the process, too. So immediately, layering the pupil texture onto the sclera texture is simple enough with a Mix Color node. You take your two textures, use the color from the Sclera into the "A" input, the color from the pupil into "B", and the Alpha from the Pupil into the "Factor".
Here's what it should look like
Now, the tricky bit, getting the eye to move like it does in SFM, but it's not so bad once it's broken down. So, what I did was make two circles just in front of each eye. Make sure that the origin points for the circles are on the Geometry of each circle, done by selecting one at a time, right clicking, and going to "Set Origin > Origin to Geometry". Name them something you'll remember, I used "Circle L" and "Circle R" (HL2 Barney is our willing test subject.)
Now, for controlling, you will need four additional nodes; "Texture Coordinate", "Separate XYZ", "Combine XYZ", and "Mapping". For each shader, eye_l and eye_r, you will need to use that eye's corresponding circle. In the screenshots, I used eye_r's config, so keep that in mind. In the "Texture Coordinate" node, go to "Object" and select your circle. Take the blue "Object" vector output and drag it to "Separate XYZ"'s vector input. Take the XYZ outputs from "Separate XYZ" And drag X to X, Y to Z, and Z to Y in "Combine XYZ". This makes it so the texture will appear correctly on the eye. Now take the vector output from "Combine XYZ" and drag it to the "Vector" input of the pupil texture.
Remember to use each circle to each eye, and this is the result when you move the circles! It may not be an exact match for SFM's movement, but it's certainly close enough. And it's a helluva lot simpler than the four hour tutorial was going to have you use. Now have the circles rigged to your skeleton's head and it'll follow the rig as well! Happy Blendering!
Hopefully the described method works well enough!
So things were going real smooth till I got to the part when attaching the mapping. For some reason when I attach it to the pupil, the pupil disappears. I have some images for you to see if I did anything wrong.
Check the origin of the circles and make sure they're set to the geometry. Also, check which circle is the one being pointed to for the control, it could be pointing to the other one by mistake
By geometry do mean the character model?
I think I figured out what's wrong. I had the circle away from the model but when I moved it closer the eye appeared. Just really stretched. Does that mean I'll have to change the circles till the eye is right or do you have another solution?
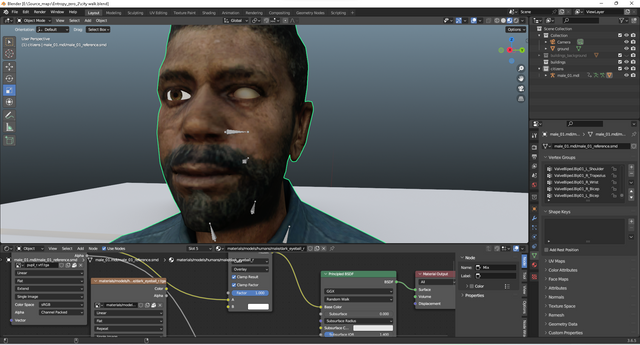
The stretch is because of the Y coordinates being read and it projecting based on the geometry. Here's a screenshot of my material setup in full
It WORKED! THANK YOU SO MUCH! :D I really recommend making a tutorial for people in the future! But I recommend you change a few things in the tutorial. 1. Don't put y 2 z and z 2 y for the seperate and combine. Put x 2 x and y 2 y 2. Don't even use the z or else the pupil will have an effect likes it's around a sphere within the eye. 3. For a good pupil size the x and y value should be .4, Your location values are fine the way they are.
Glad to hear you figured it out! I will say, The reason I used the Z value into Y is because of the height of the eyes on the model, so the eye will read the x as side to side and the z as up and down for the eye. I saw this issue with a flat plane on the ground and the Barney, where it looked fine enough on the plane, but on Barney it would warp the eye texture like the screenshot you sent where you were moving the eye closer, and not putting the y into the z means the combine will read the y value twice and make the texture stretch infinitely. Another thing that I did and forgot to mention was I locked the y position of the circle so it wouldn't be a problem with posing the circles. So using the z-location as the y was imperative for the shader to work. Also, changing the scales of the circles will affect the size of the eye textures, but scaling them down in the shader does make it more consistent with the scale of the circles at 1, so thank you for the recommendation